Thursday, December 15, 2011

Salt Dough Ornaments

I'm not exactly made of money, which is why I cry a little inside whenever I think Christmas presents. I wanted something for my aunts/uncles/cousins/neighbors/friends that would be easy, fast and cheap to make, but still looked nice. Salt dough ornaments are all of the above, and the ingredients are in your pantry!

Salt Dough Ornaments

2 cups flour
1 cup salt
1 cup water

Mix flour, salt and water until a dough ball forms (I used a mixer, but you could certainly hand mix). Knead for about 5-10 minutes. I'll admit, I was lazy and only kneaded for 5 minutes, and that was with a mixer!

Throw your dough on some parchment or wax paper if you have it and roll out until about 1/4 inch thick.

 This is an optional step, but if you'd like to add a little texture, put a towel or other fabric over the top of the dough and gently roll over it with your roller.

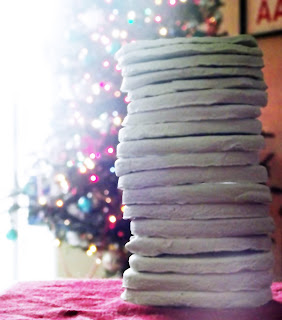
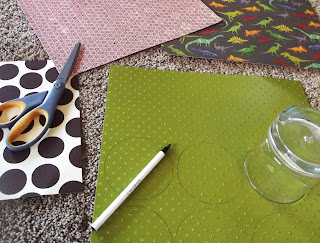
Cut ornaments into whatever shape you'd like. I used the good ol' fashioned glass method, because I'm boring. Then, take a straw and poke a hole into the top of each one. You can either let them air dry on the counter for about 48 hours if you have the time (not recommended if you live in a humid climate like I do) or you can bake at 250 degrees for about 2-3 hours. I ended up doing a combination of both, because they were not air drying fast enough for my liking. 

Next, paint the ornaments whatever color you'd like. Again, because I'm boring, I went with plain white.

Cut out scrapbook paper, wrapping paper or fabric into whatever design you want (the dinosaurs are for my nephews).

I Mod Podged the designs onto my ornament to give them a nice sheen and hung them with red twine. 

These are very easy and fun to make. You can get creative with shapes and designs. I let my son paint a few and then Mod Podged the dinosaurs onto them. And the great thing is, if you mess up it costs like ten cents to make a new batch!

Wednesday, December 14, 2011

Chocolate Chip Toffee Bars

I'm on a sweets kick...so sue me! These are rich, delicious and highly addictive. Make them today and you will thank me!


Chocolate Chip Toffee Bars

1 1/2 cups flour
1 tsp baking soda
1/2 tsp salt
1/3 cup butter
1/3 cup shortening
1/2 cup granulated sugar
1/2 cup brown sugar
1 egg
1 tsp vanilla extract
1/4 tsp almond extract (optional but highly recommended)
1 1/2 tsp spiced rum (optional but highly recommended)
3/4 cup chocolate chips + more for sprinkling
3/4 cup English toffee bits + more for sprinkling

Preheat oven to 350 degrees. Line 8x8 (or 9x9 for thinner bars) baking pan with parchment paper, allowing some to hang over the sides; spray with nonstick cooking spray. In a medium bowl, sift flour, baking soda and salt; set aside. In a separate bowl or mixer, cream butter, shortening and sugars together until light and fluffy. Add egg and mix. Add vanilla extract, almond extract and spiced rum. Slowly mix in flour mixture until just incorporated. Fold in chocolate chips and English toffee bits. Bake for 25-30 minutes until golden brown. While still warm, sprinkle the extra chocolate chips and toffee bits on top. Let cool completely before removing from pan and slicing into bars. Makes 16 bars. 


Monday, December 12, 2011

Cranberry Winks

This isn't a craft, so be warned.

I was in the baking mood the other day, so my husband asked me to make his favorite childhood Christmas cookie, cherry winks. I had never heard of, nor tasted cherry winks before because I think cherries are of the devil. I refuse to buy, taste, smell, touch or look at cherries...ok I might look at them, but only if their smell is contained (like in a jar or a picture on the interwebs). My husband knows this, so he agreed to a compromise. And thus, cranberry winks were born!


Ingredients:

2 1/4 cups all-purpose flour (I used half all-purpose, half whole wheat)
1/4 tsp salt
2 tsp baking powder
1 tsp cinnamon
1/2 cup oatmeal
1 cup sugar
1/4 cup butter, softened
1/2 cup shortening
2 eggs
2 tbsp milk
2 tsp vanilla extract
1 tsp almond extract
1/2 cup dried cranberries, divided
2 2/3 c. corn flakes (crushed to 1 1/3 c.)

Sift together flour, baking powder, cinnamon and salt. Mix in oatmeal and set aside. Place dried cranberries in a small bowl, cover with water and microwave for 2 minutes. Drain the cranberries and reserve the liquid. Finely chop 1/2 cup of the reconstituted cranberries and set aside. In mixer or large bowl beat butter, shortening and sugar until light and fluffy. Add eggs one at a time; beat well. Mix in milk, vanilla and almond extracts and 3 tsp of the cranberry liquid. Add flour mixture; mix well. Fold in chopped cranberries. Shape level tablespoon of dough into balls (dough will be sticky). Roll into crushed corn flakes. Place on greased or parchment paper lined baking sheets. Top each with a reconstituted cranberry. Bake at 350 degrees for 10 to 12 minutes or until lightly brown.

Enjoy and cherry haters unite!


Monday, November 28, 2011

Quilted Christmas Stocking

I made this stocking for my cute little girl:


I wish I could tell you how I did it, but I didn't use a pattern (of course) and vaguely remember swearing/seam ripping a lot. I think it turned out pretty cute, though! I wanted to make stockings for all of us this year, but I just don't know if I can muster up the strength to do three more. 
(P.S. Yes, I know the lines aren't perfectly straight...). 

Easy Advent Calendars

Every year my grandma has a "getting ready for Christmas" party. We always make a craft, and this year we made these advent calendars:


Easiest advent calendar ever! To do these, you need:

  • styrofoam half-circle
  • 24 holiday pencils (can be found in the $ section at Target)
  • x-acto knife
  • sturdy holiday craft paper
  • number stickers
  • holiday stickers
Cut 24 circles out of some sturdy holiday scrapbook paper. Number the blank sides from 1-24, then put a holiday sticker on the other side (you don't have to put a holiday sticker on the other side, but I know how much kids love stickers). Using an x-acto knife or other sharp knife, make a slit in each pencil eraser. Arrange the pencils in whatever order you'd like (my mom and aunt put all the pencils in one row along the outer edge of the ball, but my other aunt and I decided to do two rows). Put the numbered circles into the slit of the eraser, number side facing out. Every day starting December 1st, turn the circle to the sticker side. Easy!!


Friday, November 4, 2011

World Map Splatter Painting

I minored in Art History in college, which is ironic considering I don't have an artistic bone in my body. One thing I liked about the works of "action painters" like Jackson Pollock and James Brooks was they looked an awful lot like children's paintings. I always thought, "hey I could throw some paint on to a canvas too!" So that's exactly what I did...well, kinda.

I didn't want mine to look just like a splatter painting, so I thought I'd add a design to it to add some dimension. My husband is a bit of a map fanatic, so I chose to do a world map design.

First step - what you'll need is a couple of canvases (I got mine with a 50% off coupon at Michael's, so it was about $10 for two), a design template, paint brushes or sponge brushes, and paint. All in all, the supplies cost me $20.

Now this next step you can certainly skip if you want more contrast, but I chose to first splatter on a layer of light cream paint.  

After the paint dries, tape your design onto the canvas. I went waaay too detailed with the map and cut out little islands and stuff like that. You couldn't even really see the small island countries in the finished product, so if you do a world map, skip the detail (sorry, Iceland!). This part definitely took the longest and was the least fun. 

Next, splatter on that paint, baby! You can choose whatever colors you'd like. It was really messy and fun, and I released a lot of pent up frustration. Your kids can even help you with this part. Different brushes leave different marks. Don't be afraid to experiment because there's no way you can mess this up. I got mine on nice and thick in some areas and then added a little water to the paint to get more of a spatter effect and less of a globby effect.

Let the paint dry a little, but not all the way, or else your paper will stick to the canvas when you peel it off. The thicker the layers of paint, the crisper your edges.


So there you have it! So easy a kid could do it (or me, same thing, really), and your friends will be impressed with your custom "Jackson Pollock art".

Sunday, October 30, 2011

Flower Headband


This was a really easy-to-make felt (aka cheap!) headband. I got the pattern from here. Instead of using elastic bands for the headband part, I used baby pantyhose. You can get several headbands out of each pair of pantyhose and it's nice and soft on baby's head and doesn't leave those red marks. 

Halloween Romans

A couple months ago, I went to Target with my son, who spotted this super cool gold Romanesque looking headband. I can't remember exactly how much it was but it was around $15, and because I'm cheap, I let him play with it while I shopped around. During that trip, I kinda fell in love with it and bought it, with the excuse that I would make my son a Roman for Halloween so I'd get some good use out of it. So here's my cute little boy with his little Roman baby sister. Doesn't he look thrilled?!


Now, I'm no seamstress, but these costumes were super easy! I didn't even use a pattern, I just eyeballed it.  I bought a two pack of pillowcases at Target and that was more than enough fabric for both costumes. The ribbon, gold rope, trim on my daughter's costume, and little gold thing for her bow cost maybe $10, and the sword was $5 at party warehouse. The pillowcases were $5, and the red sash was scrap fabric I found in my garage (well, it was an old tablecloth that I never ever use). Halloween costumes are expensive, and usually too thick and hot for October in Florida. So don't be afraid to make your own! 

Always a Bow

When I found out I was pregnant with a girl, I told my husband she would always wear a bow in her hair...even in her ultrasound picture!


I printed out her ultrasound picture (just on regular paper on my printer...nothing fancy), taped a little felt bow on her head and put it in an old Ikea frame I found in my garage. This cost me about 25 cents for the felt (well, it came in a 15 pack or something) and I think the frame was $4 or $5. Nice, eh? This was by far the easiest and cheapest thing I did in my little girl's nursery. 

Alphabet Wall Art


My son was learning the alphabet while I was putting together my baby girl's room, so I decided to make alphabet wall art for her nursery. I got my inspiration from here, but since I wasn't cool enough to discover Etsy until very recently, I decided to make the letters myself. 


Basically, I bought a bunch of scrapbook paper for around $5 for the background. Then I cut out the letters and glued them to the paper. Then I went to the Dollar Store and found a bunch of frames (easier said than done to find 26 of the same frame). They were black, so I spray painted them white. Then my son thought it'd be awesome to touch all the letters and one of the frames fell and broke. I went back to the Dollar Store and they had no more of the frames I had used, so I bought some similar ones. Now I was about 8 months pregnant at this time and it was July and hot and humid, so I decided against more spray painting and decided, why try to hide the different frames? So I put all the vowels in the different black frames. 

To hang these frames, I got some wall putty and stuck them all up in a line slightly lower than where I wanted them to actually hang. Then I measured the middle of each frame and drew a little line where I needed to place the nail. Then I nailed them and hung them up. Tedious? Yes. Crooked? Maybe. But it was easier than  trying to eyeball it because I just know I'd end up with a gazillion holes in the wall.