My Bad Crafts
Wednesday, May 23, 2012
Chocolate Chip Nut Butter Muffins
I love these muffins! They are sweet but not too sweet and have a lot of protein. Great for a treat or on-the-go breakfast. You could also add flax or chia seeds (or both!) to up the nutritional value.
Ingredients
1/4 cup natural creamy peanut butter
1/4 cup sunflower nut butter
1/2 cup raw agave nectar
2 tbsp light margarine (or coconut oil)
1/2 cup plain Greek yogurt
1/3 cup water
1 tsp vanilla
1 egg white
1 cup whole wheat or all purpose flour
1 tsp baking powder
1 tsp baking soda
1/2 tsp salt
2/3 cup chocolate chips (I used bittersweet Ghiradelli chocolate chips)
Preheat oven to 350 degrees F. Line muffin tins with paper liners. Mix peanut butter, sunflower nut butter, agave nectar, and margarine until well blended. Add yogurt, vanilla, egg white, and water and blend well. In a separate bowl, mix flour, baking powder, baking soda, and salt. Slowly mix the dry ingredients into the wet. Do not over mix. Fold in chocolate chips. Divide evenly into muffin cups and baking for 20 minutes or until an inserted toothpick comes out clean. Makes 12 muffins.
Thursday, February 16, 2012
Baby T-Shirt Sleep Sack
Have you ever seen that part in Talladega Nights where Ricky Bobby is doing the commercial and he doesn't know what to do with his hands so he keeps putting them by his face? Well, I swear my daughter is like Ricky Bobby...her hands are constantly by her face. She scratches herself and pulls her pacifier out of her mouth all the time and it drives me nuts! She's six months old and I still have to swaddle her for her to fall asleep. I do the double swaddle technique because she's too big for any other type of swaddle and then put her in an arm-less fleece sleep sack. Well, it may be February but it is HOT here, and my little girl is like a heater. She's usually so sweaty when she wakes up. So during her nap today (with the A/C going full blast) I whipped up this no-pattern sleep sack using an old t-shirt. Here's how I did it:
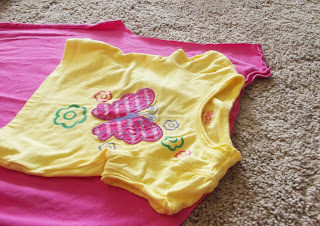
Cut the shirt along the seams until you have two panels. Sorry 'bout the cat. She loves to lay on/walk on things when I'm cutting with sharp scissors.
Line up the baby shirt with the back panel and cut to the size of the top of the shirt.
Repeat with the front panel. I left a little more room because the neckline isn't as stretchy as a regular t-shirt and, well, my baby has a big noggin. When you're done, sew the panels together, leaving the bottom open. I also trimmed the bottom edges before sewing together but you don't have to.
Grab some elastic, or if you're like me and are too lazy to go to the store and get some, you can use the top elastic part of little girl's tights. It also happened to be just the right size (these were 18-24 month size). Just cut one end so it is a long strip.
With the wrong side facing out, fold the bottom of the shirt up so it covers the elastic plus a centimeter (more or less) more and pin.
Pin all the way around the shirt (I found it helpful to cut about three inches up one side of the shirt because I was dumb and didn't leave a space). Sew the edges in place.
Using a pen or another long, skinny object, push the elastic all the way through the opening until it comes out the other side. Sew the elastic pieces together and then sew together the side.
Place your adorable baby inside the sack and stop worrying about Ricky Bobby hands knocking out the pacifier and pools of sweat on your baby's back! Jersey material is very forgiving and easy to work with, so this is a perfect "experiment" project. It doesn't have to look perfect (and trust me, mine doesn't!).
Thursday, December 15, 2011
Salt Dough Ornaments
I'm not exactly made of money, which is why I cry a little inside whenever I think Christmas presents. I wanted something for my aunts/uncles/cousins/neighbors/friends that would be easy, fast and cheap to make, but still looked nice. Salt dough ornaments are all of the above, and the ingredients are in your pantry!
Salt Dough Ornaments
2 cups flour
1 cup salt
1 cup water
Mix flour, salt and water until a dough ball forms (I used a mixer, but you could certainly hand mix). Knead for about 5-10 minutes. I'll admit, I was lazy and only kneaded for 5 minutes, and that was with a mixer!
Throw your dough on some parchment or wax paper if you have it and roll out until about 1/4 inch thick.
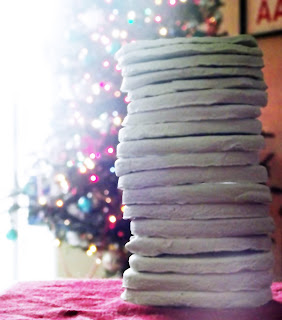
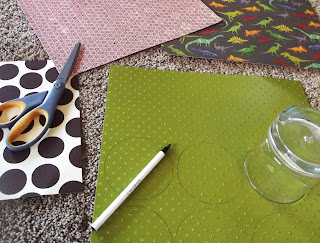
Cut ornaments into whatever shape you'd like. I used the good ol' fashioned glass method, because I'm boring. Then, take a straw and poke a hole into the top of each one. You can either let them air dry on the counter for about 48 hours if you have the time (not recommended if you live in a humid climate like I do) or you can bake at 250 degrees for about 2-3 hours. I ended up doing a combination of both, because they were not air drying fast enough for my liking.
Next, paint the ornaments whatever color you'd like. Again, because I'm boring, I went with plain white.
Cut out scrapbook paper, wrapping paper or fabric into whatever design you want (the dinosaurs are for my nephews).
I Mod Podged the designs onto my ornament to give them a nice sheen and hung them with red twine.
These are very easy and fun to make. You can get creative with shapes and designs. I let my son paint a few and then Mod Podged the dinosaurs onto them. And the great thing is, if you mess up it costs like ten cents to make a new batch!
Wednesday, December 14, 2011
Chocolate Chip Toffee Bars
I'm on a sweets kick...so sue me! These are rich, delicious and highly addictive. Make them today and you will thank me!
Chocolate Chip Toffee Bars
1 1/2 cups flour
1 tsp baking soda
1/2 tsp salt
1/3 cup butter
1/3 cup shortening
1/2 cup granulated sugar
1/2 cup brown sugar
1 egg
1 tsp vanilla extract
1/4 tsp almond extract (optional but highly recommended)
1 1/2 tsp spiced rum (optional but highly recommended)
3/4 cup chocolate chips + more for sprinkling
3/4 cup English toffee bits + more for sprinkling
Preheat oven to 350 degrees. Line 8x8 (or 9x9 for thinner bars) baking pan with parchment paper, allowing some to hang over the sides; spray with nonstick cooking spray. In a medium bowl, sift flour, baking soda and salt; set aside. In a separate bowl or mixer, cream butter, shortening and sugars together until light and fluffy. Add egg and mix. Add vanilla extract, almond extract and spiced rum. Slowly mix in flour mixture until just incorporated. Fold in chocolate chips and English toffee bits. Bake for 25-30 minutes until golden brown. While still warm, sprinkle the extra chocolate chips and toffee bits on top. Let cool completely before removing from pan and slicing into bars. Makes 16 bars.
Monday, December 12, 2011
Cranberry Winks
This isn't a craft, so be warned.
I was in the baking mood the other day, so my husband asked me to make his favorite childhood Christmas cookie, cherry winks. I had never heard of, nor tasted cherry winks before because I think cherries are of the devil. I refuse to buy, taste, smell, touch or look at cherries...ok I might look at them, but only if their smell is contained (like in a jar or a picture on the interwebs). My husband knows this, so he agreed to a compromise. And thus, cranberry winks were born!
Ingredients:
2 1/4 cups all-purpose flour (I used half all-purpose, half whole wheat)
1/4 tsp salt
2 tsp baking powder
1 tsp cinnamon
1/2 cup oatmeal
1 cup sugar
1/4 cup butter, softened
1/2 cup shortening
2 eggs
2 tbsp milk
2 tsp vanilla extract
1 tsp almond extract
1/2 cup dried cranberries, divided
2 2/3 c. corn flakes (crushed to 1 1/3 c.)
Sift together flour, baking powder, cinnamon and salt. Mix in oatmeal and set aside. Place dried cranberries in a small bowl, cover with water and microwave for 2 minutes. Drain the cranberries and reserve the liquid. Finely chop 1/2 cup of the reconstituted cranberries and set aside. In mixer or large bowl beat butter, shortening and sugar until light and fluffy. Add eggs one at a time; beat well. Mix in milk, vanilla and almond extracts and 3 tsp of the cranberry liquid. Add flour mixture; mix well. Fold in chopped cranberries. Shape level tablespoon of dough into balls (dough will be sticky). Roll into crushed corn flakes. Place on greased or parchment paper lined baking sheets. Top each with a reconstituted cranberry. Bake at 350 degrees for 10 to 12 minutes or until lightly brown.
Enjoy and cherry haters unite!
Monday, November 28, 2011
Quilted Christmas Stocking
I made this stocking for my cute little girl:
I wish I could tell you how I did it, but I didn't use a pattern (of course) and vaguely remember swearing/seam ripping a lot. I think it turned out pretty cute, though! I wanted to make stockings for all of us this year, but I just don't know if I can muster up the strength to do three more.
(P.S. Yes, I know the lines aren't perfectly straight...).
Easy Advent Calendars
Every year my grandma has a "getting ready for Christmas" party. We always make a craft, and this year we made these advent calendars:
Easiest advent calendar ever! To do these, you need:
Easiest advent calendar ever! To do these, you need:
- styrofoam half-circle
- 24 holiday pencils (can be found in the $ section at Target)
- x-acto knife
- sturdy holiday craft paper
- number stickers
- holiday stickers
Cut 24 circles out of some sturdy holiday scrapbook paper. Number the blank sides from 1-24, then put a holiday sticker on the other side (you don't have to put a holiday sticker on the other side, but I know how much kids love stickers). Using an x-acto knife or other sharp knife, make a slit in each pencil eraser. Arrange the pencils in whatever order you'd like (my mom and aunt put all the pencils in one row along the outer edge of the ball, but my other aunt and I decided to do two rows). Put the numbered circles into the slit of the eraser, number side facing out. Every day starting December 1st, turn the circle to the sticker side. Easy!!
Subscribe to:
Comments (Atom)


